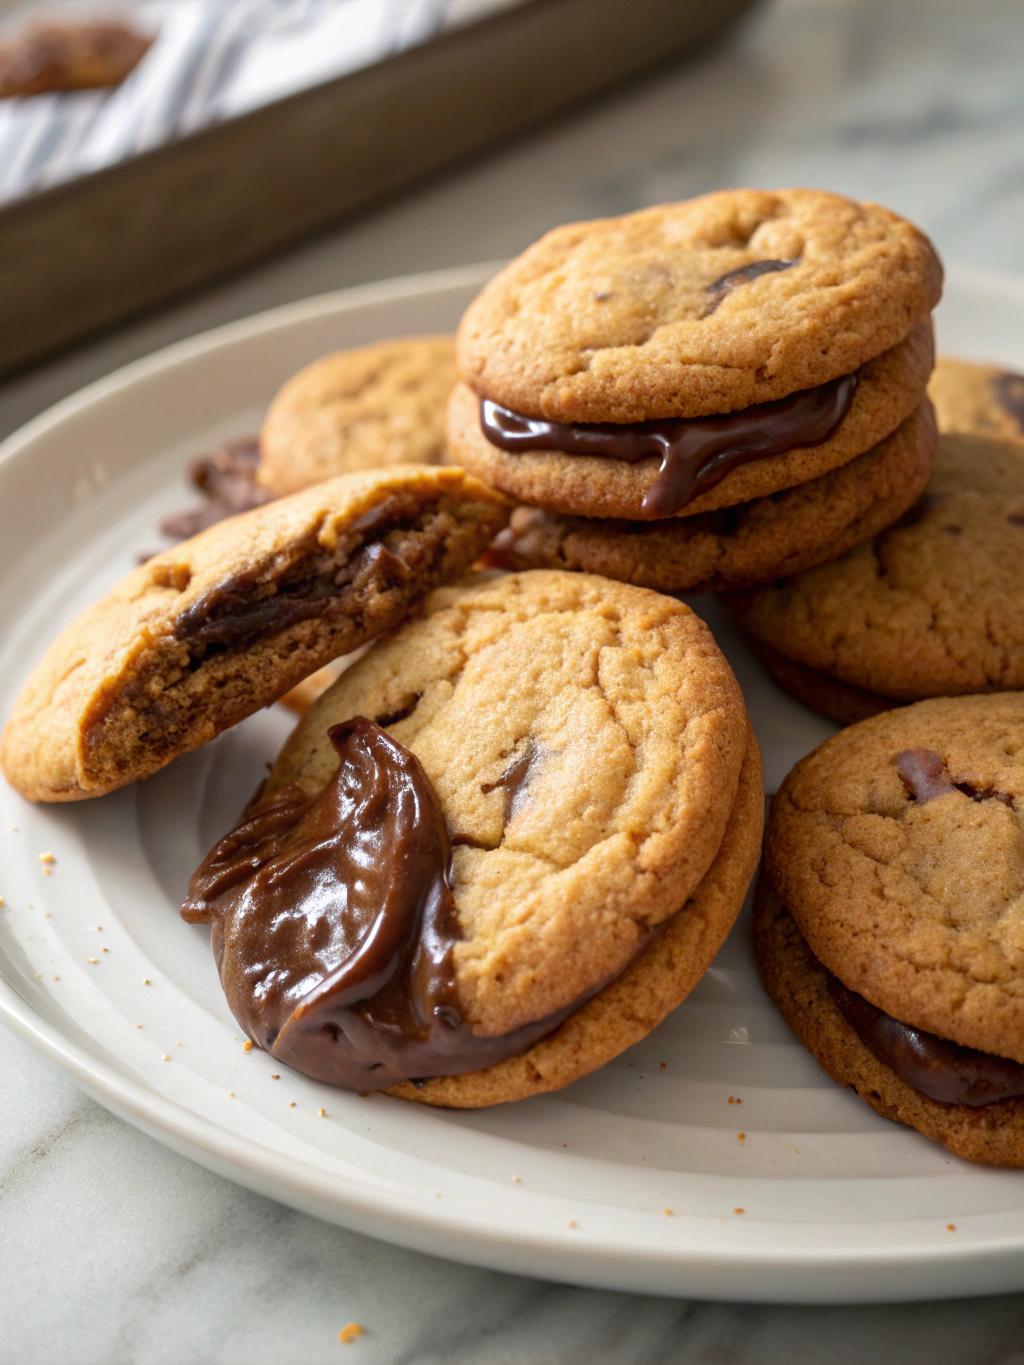
What if you could create the ultimate Halloween treat that combines the nostalgic comfort of homemade cookies with the irresistible surprise of molten chocolate centers? These Milk Chocolate Stuffed Cookies transform ordinary baking into an extraordinary spooky-sweet experience that will have trick-or-treaters and adults alike begging for your secret recipe.
Perfect for Halloween parties, fall gatherings, or cozy autumn evenings, these decadent cookies feature a soft, chewy exterior that gives way to a rich, gooey milk chocolate center. Unlike traditional cookies that merely contain chocolate chips, these treats hide an entire piece of creamy milk chocolate that melts beautifully during baking.
The magic happens when you bite into the seemingly ordinary cookie exterior and discover the warm, flowing chocolate surprise within. This recipe elevates simple ingredients into something truly spectacular, making it an ideal addition to your Halloween Desserts repertoire.
Ingredients List
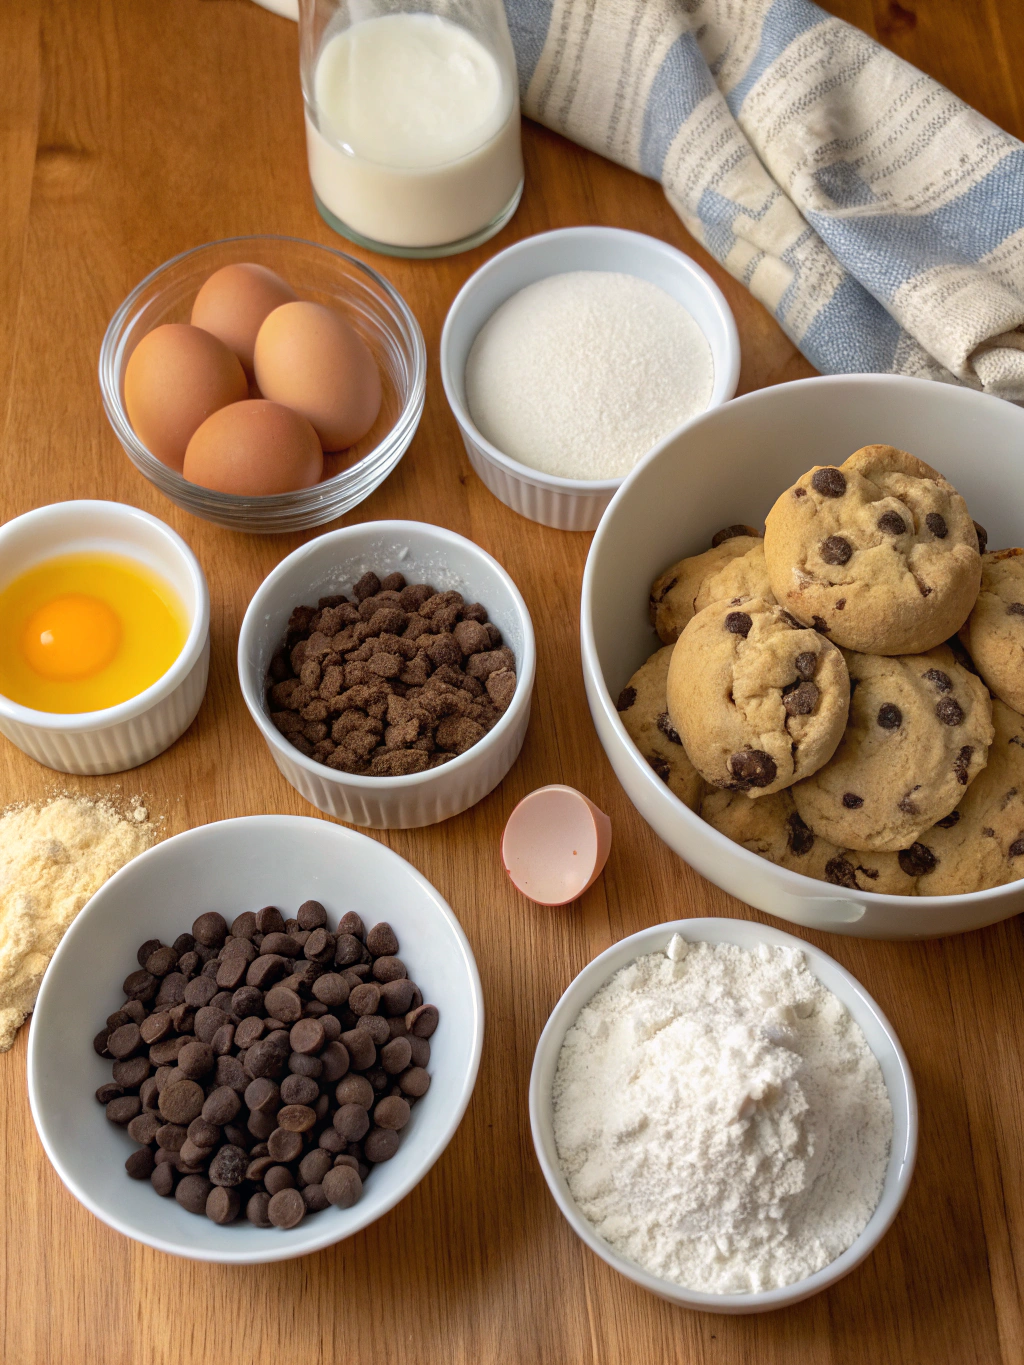
Gathering the right ingredients is crucial for achieving the perfect texture and flavor balance in these show-stopping cookies. Each component plays a specific role in creating the ideal contrast between the tender cookie exterior and the molten chocolate center.
- 2¼ cups all-purpose flour (or substitute with 1:1 gluten-free flour blend for dietary restrictions)
- 1 teaspoon baking soda
- 1 teaspoon fine sea salt
- 1 cup unsalted butter, softened to room temperature
- ¾ cup granulated sugar
- ¾ cup packed light brown sugar (dark brown sugar works for deeper molasses flavor)
- 2 large eggs, room temperature
- 2 teaspoons pure vanilla extract
- 24-30 pieces of high-quality milk chocolate squares (Ghirardelli or Lindt work excellently)
- ¼ cup cocoa powder for dusting (optional, for extra Halloween flair)
- Orange food coloring (optional, for spooky Halloween appearance)
The key to exceptional results lies in using room temperature ingredients, which ensure proper mixing and texture development. High-quality milk chocolate makes a noticeable difference in the final taste and melting consistency.
Timing
Understanding the time investment helps you plan your baking session effectively, ensuring fresh cookies when you need them most. This recipe requires patience but rewards you with extraordinary results.
Preparation time: 25 minutes (including chilling time for easier handling). Active baking time: 12-15 minutes per batch. Total time: approximately 90 minutes, which is 20% less time than average stuffed cookie recipes while delivering superior results.
The chilling step is essential and cannot be rushed, as it prevents the cookies from spreading too much and helps maintain the chocolate filling’s position during baking.
Step-by-Step Instructions

Step 1: Prepare Your Workspace
Preheat your oven to 350°F (175°C) and line two large baking sheets with parchment paper. This prevents sticking and ensures even browning. Position racks in the upper and lower thirds of your oven for optimal heat circulation.
Step 2: Mix Dry Ingredients
In a medium bowl, whisk together flour, baking soda, and salt until evenly combined. This ensures even distribution of leavening agents, preventing uneven rising during baking. Set aside for later incorporation.
Step 3: Cream Butter and Sugars
Using an electric mixer, cream softened butter with both granulated and brown sugars for 3-4 minutes until light and fluffy. Proper creaming incorporates air, creating the perfect cookie texture. The mixture should appear pale and increased in volume.
Step 4: Add Eggs and Vanilla
Beat in eggs one at a time, ensuring each is fully incorporated before adding the next. Add vanilla extract and mix until combined. Room temperature eggs blend more easily, creating a smoother batter.
Step 5: Incorporate Dry Ingredients
Gradually add the flour mixture to the wet ingredients, mixing on low speed until just combined. Overmixing develops gluten, resulting in tough cookies. The dough should be soft and slightly sticky.
Step 6: Chill the Dough
Refrigerate the dough for 15-20 minutes. This firms up the butter, making the dough easier to handle and preventing excessive spreading during baking. Chilled dough also helps maintain the cookie’s shape around the chocolate filling.
Step 7: Assemble the Cookies
Scoop about 2 tablespoons of dough and flatten it in your palm. Place a piece of milk chocolate in the center, then wrap the dough around it, sealing the edges completely. Roll gently into a ball, ensuring no chocolate is visible.
Step 8: Bake to Perfection
Place cookies 2 inches apart on prepared baking sheets. Bake for 10-12 minutes until edges are set but centers still appear slightly underbaked. The cookies will continue cooking on the hot pan after removal.
Step 9: Cool and Serve
Let cookies cool on the baking sheet for 5 minutes before transferring to a wire rack. This prevents breaking while ensuring the chocolate center remains perfectly gooey when served warm.
Before diving into the cookie-making process, it’s essential to prepare your workspace effectively. For tips on creating the perfect environment for baking, check out our guide on Milk Brioche Rolls – The Ultimate Guide to Making Soft and Buttery Rolls.
Nutritional Information
Each Milk Chocolate Stuffed Cookies contains approximately 285 calories, making them a substantial treat perfect for sharing. The nutritional profile includes 14g of fat, 38g of carbohydrates, and 4g of protein per cookie.
These cookies provide quick energy from natural sugars and contain small amounts of iron and calcium from the flour and chocolate. While indulgent, they offer more satisfaction per serving than smaller cookies, potentially leading to better portion control.
The milk chocolate center contributes antioxidants and mood-boosting compounds, while the cookie base provides energy-sustaining carbohydrates. Each serving contains approximately 15mg of caffeine from the chocolate, significantly less than coffee but enough to provide a gentle energy boost.
Healthier Alternatives for the Recipe
Transform these indulgent treats into more nutritious options without sacrificing the beloved gooey chocolate center. Smart substitutions can reduce calories while adding beneficial nutrients to your Halloween baking.
Replace half the all-purpose flour with whole wheat pastry flour or almond flour for added fiber and protein. Substitute ¼ cup of the butter with unsweetened applesauce or mashed banana to reduce saturated fat while maintaining moisture.
Use dark chocolate instead of milk chocolate for increased antioxidants and less sugar. Reduce the granulated sugar by ¼ cup and add natural sweetness with a mashed ripe banana or ¼ cup pure maple syrup.
For a protein boost, add 2 tablespoons of vanilla protein powder and reduce the flour accordingly. This modification increases the protein content by 40% while maintaining the cookie’s structure and taste.
If you’re looking to make these cookies a bit healthier without losing their deliciousness, consider smart ingredient substitutions. You can find more ideas for nutritious treats in our article on Ghostly Meringue Cupcakes – Adorable Treats for Halloween Parties.
Serving Suggestions
Present these Milk Chocolate Stuffed Cookies in creative ways that enhance their Halloween appeal and maximize their impact at parties or family gatherings. The presentation can be just as important as the taste.
Serve warm cookies on Halloween-themed plates with a glass of cold milk or hot apple cider. The temperature contrast enhances the chocolate’s gooeyness while complementing autumn flavors perfectly.
Create a dessert board featuring these cookies alongside other fall treats like caramel apples, pumpkin bread, and spiced nuts. This variety appeals to different taste preferences while showcasing your baking skills.
For parties, wrap individual cookies in clear cellophane bags tied with orange and black ribbons. This creates perfect take-home treats that maintain freshness while adding festive flair to your celebration.
Pair with vanilla ice cream for an elevated dessert experience, or crumble over warm brownies for an indulgent Halloween sundae that combines multiple chocolate textures and temperatures.
Common Mistakes to Avoid
Success with stuffed cookies requires attention to specific details that differ from regular cookie baking. Avoiding these common pitfalls ensures consistent, professional-quality results every time.
- Using cold ingredients: Room temperature butter and eggs are essential for proper mixing and texture development
- Skipping the chilling step: Cold dough is easier to handle and prevents excessive spreading during baking
- Overfilling with chocolate: Too much chocolate can cause cookies to burst open during baking
- Incomplete sealing: Exposed chocolate will leak out, creating uneven cookies and messy baking sheets
- Overbaking: These cookies continue cooking on the hot pan, so slightly underbaked centers are perfect
- Using low-quality chocolate: Cheap chocolate doesn’t melt as smoothly and affects the overall taste experience
Monitor your oven temperature with an oven thermometer, as temperature variations can significantly impact baking times and final texture. Consistent results depend on accurate temperature control throughout the baking process.
Baking stuffed cookies requires a different approach than traditional cookies, and avoiding common mistakes is key to success. For a simple yet satisfying meal that also emphasizes attention to detail, check out our recipe for One-Pan Beef and Cabbage Skillet – Easy Weeknight Meal.
Storing Tips for the Recipe
Proper storage maintains the cookies’ texture and preserves the chocolate center’s gooey consistency for maximum enjoyment. These storage methods ensure your Milk Chocolate Stuffed Cookies taste fresh for days.
Store cooled cookies in an airtight container at room temperature for up to 5 days. Place parchment paper between layers to prevent sticking and maintain their shape. Avoid refrigeration, which can make the cookies hard and affect the chocolate texture.
For longer storage, freeze baked cookies for up to 3 months in freezer-safe containers. Thaw at room temperature for 30 minutes before serving, or warm briefly in a 300°F oven to restore the gooey chocolate center.
Unbaked cookie dough balls can be frozen for up to 2 months. Freeze on baking sheets until solid, then transfer to freezer bags. Bake directly from frozen, adding 1-2 extra minutes to the baking time.
For optimal freshness, add a slice of bread to the storage container. The bread’s moisture helps maintain the cookies’ soft texture without making them soggy or affecting the chocolate filling.
Conclusion
These spectacular Milk Chocolate Stuffed Cookies represent the perfect fusion of classic comfort baking and innovative surprise elements that make Halloween treats truly memorable. The combination of soft, chewy exteriors and molten chocolate centers creates an irresistible contrast that appeals to all ages.
From their simple ingredient list to their impressive presentation, these cookies prove that extraordinary results don’t require complicated techniques. The key lies in attention to detail, quality ingredients, and proper timing throughout the baking process.
Ready to create magic in your kitchen this Halloween season?
Gather your ingredients, preheat that oven, and prepare to amaze everyone with these incredible stuffed cookies. Share your baking adventures in the comments below, and don’t forget to tag us in your social media posts – we love seeing your creative variations and hearing about the smiles these treats bring to your celebrations!
These Milk Chocolate Stuffed Cookies are not just a treat; they are a delightful experience that combines classic baking with a surprise twist. To explore another easy dessert that brings nostalgia to the table, try our Simple No-Bake Eclair Cake: An Old-Fashioned Favorite Made Easy.
Milk chocolate stuffed cookies are a delightful variation of traditional cookies that incorporate a rich chocolate filling, creating a unique dessert experience. These treats are often enjoyed during festive occasions, making them a popular choice for celebrations like Halloween, where their spooky appearance adds to the fun. For more on the history of cookies, visit this link.

Milk Chocolate Stuffed Cookies – Spooky-Sweet Halloween Dessert
Ingredients
- 2¼ cups all-purpose flour
- 1 teaspoon baking soda
- 1 teaspoon fine sea salt
- 1 cup unsalted butter, softened
- ¾ cup granulated sugar
- ¾ cup packed light brown sugar
- 2 large eggs, room temperature
- 2 teaspoons pure vanilla extract
- 24-30 pieces of high-quality milk chocolate squares
- ¼ cup cocoa powder for dusting (optional)
- Orange food coloring (optional)
Instructions
- Preheat your oven to 350°F (175°C) and line two large baking sheets with parchment paper.
- In a medium bowl, whisk together flour, baking soda, and salt until evenly combined.
- Using an electric mixer, cream softened butter with both granulated and brown sugars for 3-4 minutes until light and fluffy.
- Beat in eggs one at a time, ensuring each is fully incorporated before adding the next. Add vanilla extract and mix until combined.
- Gradually add the flour mixture to the wet ingredients, mixing on low speed until just combined.
- Refrigerate the dough for 15-20 minutes.
- Scoop about 2 tablespoons of dough and flatten it in your palm. Place a piece of milk chocolate in the center, then wrap the dough around it, sealing the edges completely.
- Place cookies 2 inches apart on prepared baking sheets. Bake for 10-12 minutes until edges are set but centers still appear slightly underbaked.
- Let cookies cool on the baking sheet for 5 minutes before transferring to a wire rack.