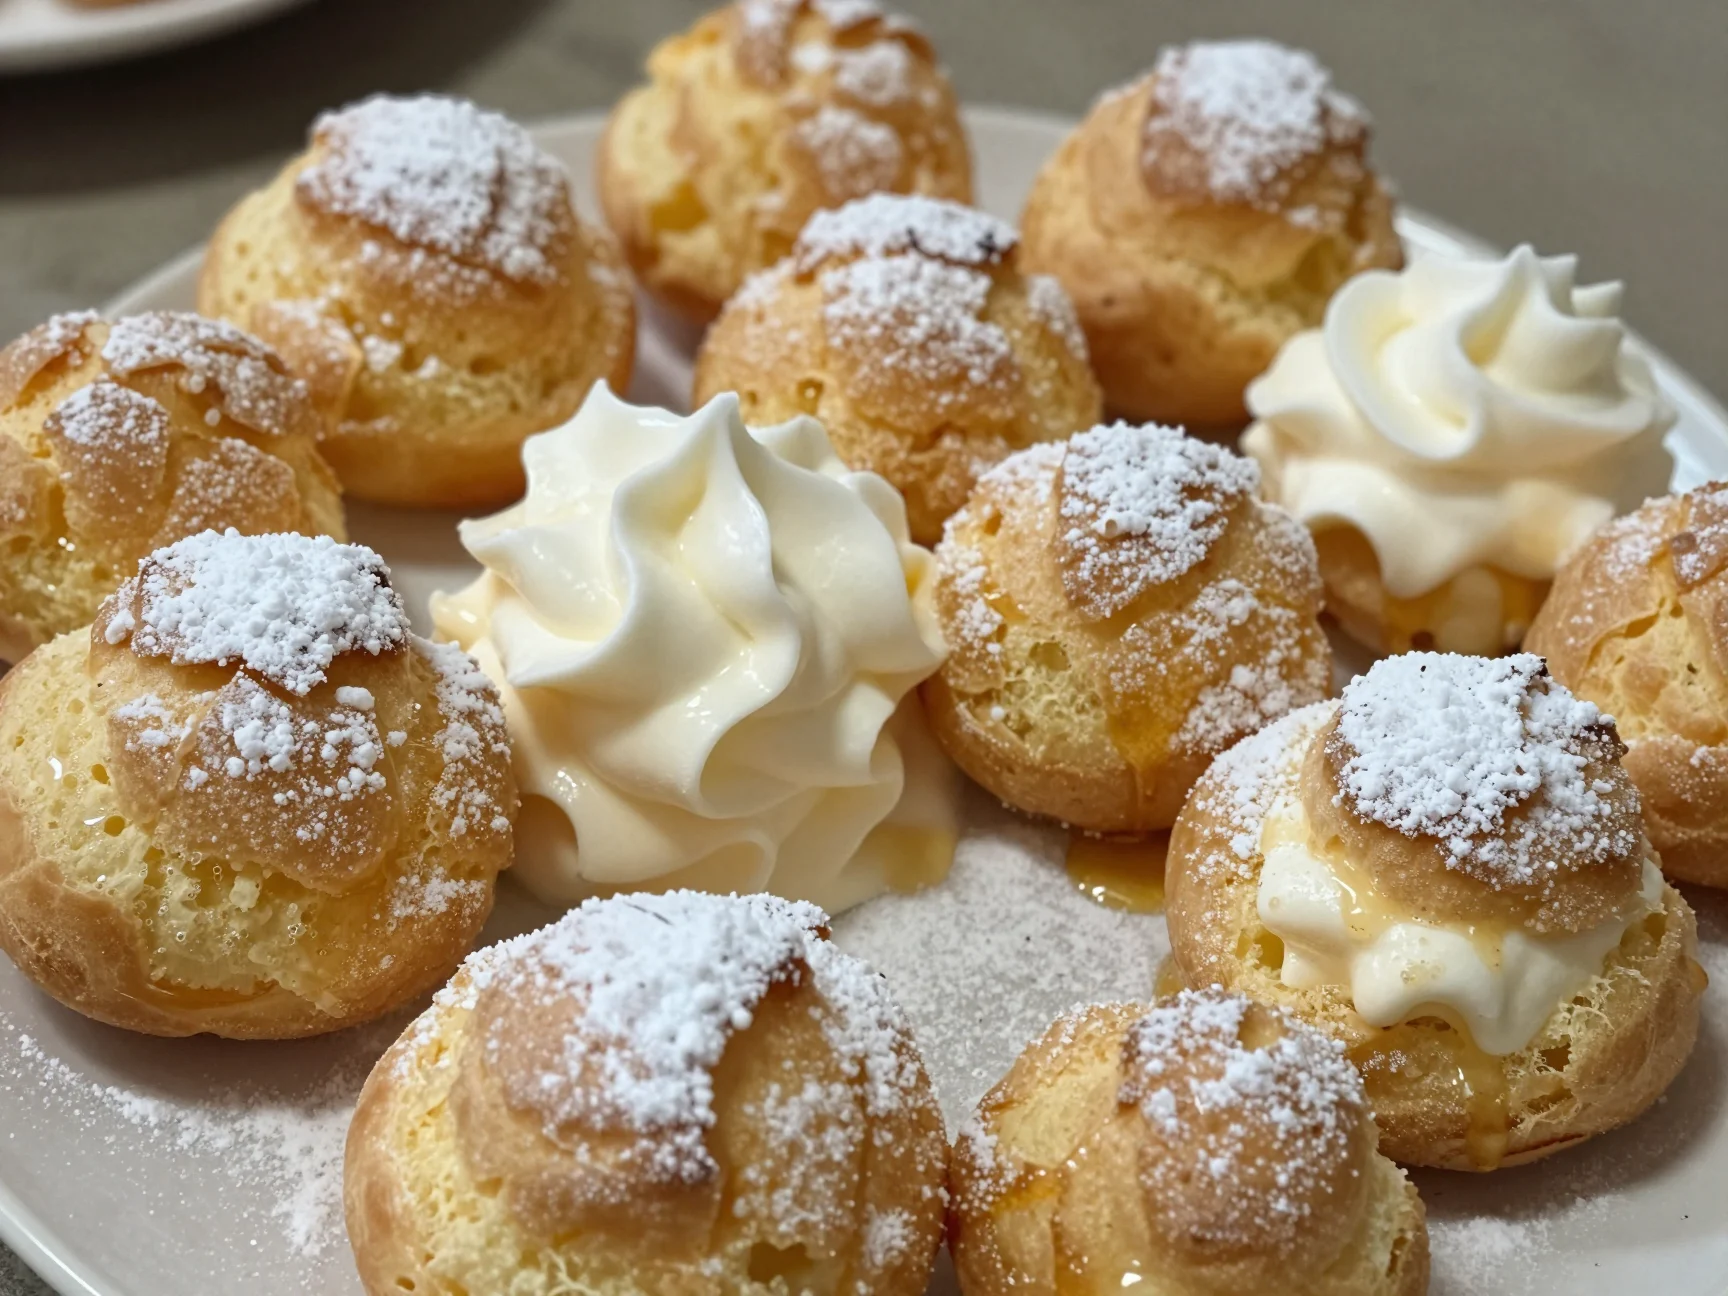
I remember the first time I tried to make a batch of cream puffs for Mona. It was early in our marriage, and I wanted to impress her with a French classic. I spent hours in the kitchen, following a complicated manual that used more technical jargon than actual cooking advice.
The result? A tray of flat, soggy disks that looked more like pancakes than pastry. I felt defeated, but Mona, ever the optimist, just laughed and dipped one into a bowl of whipped cream.
She told me it tasted great, but I knew I could do better. That failed attempt was the spark that led us to create SecondRecipes.com. I realized that home cooks do not need complex techniques or fancy equipment to make gourmet treats.
You just need a reliable, streamlined process. These Easy Cream Puffs are the result of years of testing and simplification. I have stripped away the fluff and kept the flavor, creating a version that is lighter, more balanced, and virtually foolproof.
These Easy Cream Puffs represent my philosophy of giving every recipe a second chance to shine in a modern kitchen. Now, when I pull a tray of these golden, airy clouds out of the oven, I do not feel stressed. I feel proud because I know how much joy a simple, perfect pastry brings to our table. These Easy Cream Puffs are now a staple in our home, and I am thrilled to share the secret with you.
Why You’ll Love These Easy Cream Puffs
You will love these Easy Cream Puffs because they deliver a high-end bakery experience without the high-end stress. Many people feel intimidated by choux pastry, but this recipe breaks the process down into manageable, logical steps. We focus on the balance of textures, a crisp, golden shell on the outside and a soft, hollow center ready to hold your favorite filling.
Unlike many store-bought versions that feel heavy or overly sweet, these Easy Cream Puffs offer a delicate lightness that allows the vanilla and cream to truly stand out. This recipe is also incredibly versatile. You can dress them up for a fancy dinner party or keep them casual for a weekend brunch.
Because we use simple, pantry-staple ingredients, you can whip up a batch of Easy Cream Puffs whenever the craving hits. Mona and I also appreciate that these are naturally portion-controlled. They provide the perfect bite of sweetness without leaving you feeling weighed down. Whether you are a beginner or a seasoned pro, these Easy Cream Puffs will become your go-to dessert for any occasion.
Ingredients You’ll Need
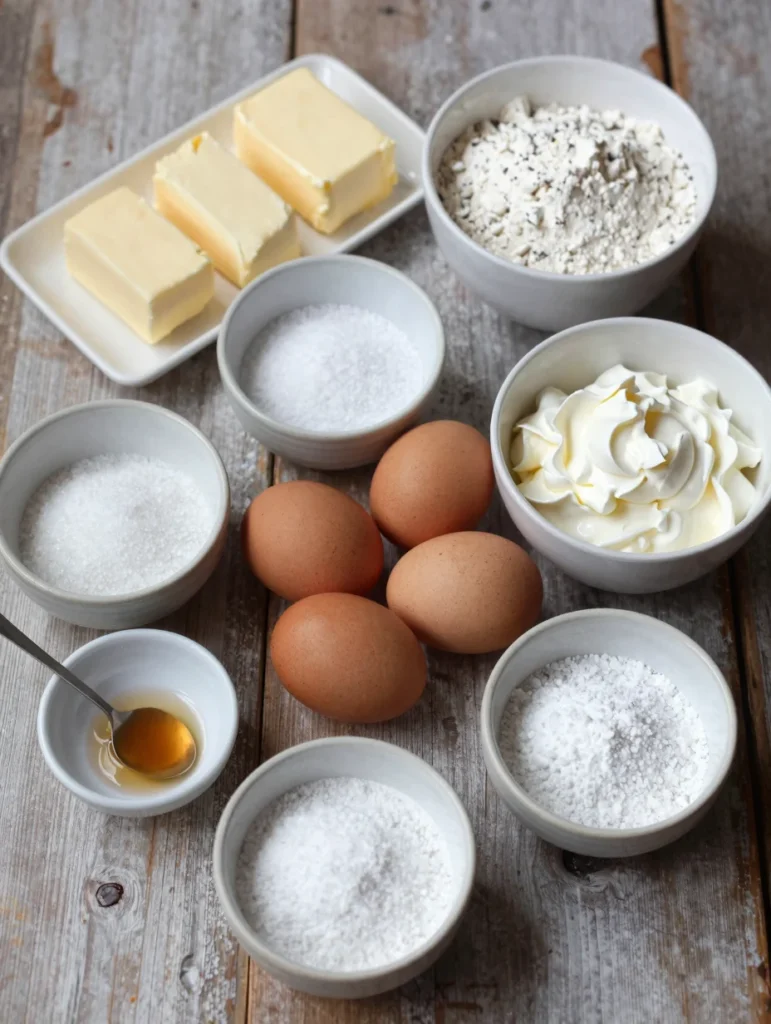
To make the best Easy Cream Puffs, you need fresh, high-quality ingredients. The magic happens when these simple items transform through heat and steam. Below is the list of everything you will need to get started.
| Ingredient Category | Items Needed |
|---|---|
| Pastry Liquid | 1 cup Water, 1/2 cup Unsalted Butter (cubed) |
| Pastry Base | 1 cup All-Purpose Flour, 1/4 teaspoon Salt, 1 teaspoon Granulated Sugar |
| Pastry Structure | 4 Large Eggs (at room temperature) |
| Filling Base | 2 cups Heavy Whipping Cream (cold) |
| Filling Flavor | 1/2 cup Powdered Sugar, 1 teaspoon Pure Vanilla Extract |
Substitutions & Variations
I always encourage creativity in the kitchen, and these Easy Cream Puffs are the perfect canvas for your personal touch. If you prefer a more savory twist, you can omit the sugar from the pastry dough and fill the Easy Cream Puffs with an herb-flecked goat cheese mousse or a light chicken salad. For those who need a dairy-free option, you can substitute the butter with a high-quality vegan butter stick and use a coconut cream whip for the filling.
While I love the classic vanilla cream, you can easily transform these into Easy Cream Puffs with chocolate by folding some cocoa powder or melted ganache into the whipped cream. Another popular variation is the “Profiterole” style, where you fill the Easy Cream Puffs with vanilla bean ice cream and drizzle warm chocolate sauce over the top.
If you want a bit of crunch, sprinkle some sliced almonds or pearl sugar on the dough before you put the Easy Cream Puffs into the oven. The possibilities are truly endless once you master the basic shell of the Easy Cream Puffs.
I always encourage creativity in the kitchen, and these Easy Cream Puffs are the perfect canvas for your personal touch. For a refreshing twist, consider pairing them with a delightful Easy Watermelon Sorbet.
Step-by-Step Instructions
Creating Easy Cream Puffs requires a specific sequence, but once you understand the “why” behind the steps, it becomes second nature. Follow these instructions closely for the best results.
- Preheat and Prepare: Start by preheating your oven to 425°F (220°C). Line two large baking sheets with parchment paper or silicone baking mats. This ensures your Easy Cream Puffs do not stick to the pan.
- Boil the Mixture: In a medium saucepan, combine the water, cubed butter, sugar, and salt. Place the pan over medium-high heat and bring the mixture to a full, rolling boil. Ensure the butter melts completely before the water boils too much.
- Add the Flour: As soon as the mixture boils, remove the pan from the heat. Dump in all the flour at once. Stir vigorously with a wooden spoon until the flour fully incorporates.
- Cook the Dough: Return the pan to medium heat. Continue stirring the dough for about 1 to 2 minutes. You are looking for a film to form on the bottom of the pan and for the dough to pull away from the sides into a smooth ball. This step cooks out excess moisture, which is vital for the structure of Easy Cream Puffs.
- Cool the Dough: Transfer the dough to a large mixing bowl or the bowl of a stand mixer. Let it sit for about 5 minutes to cool slightly. You do not want the dough to be so hot that it cooks the eggs instantly.
- Incorporate the Eggs: Add the eggs one at a time. Beat well after each addition using a wooden spoon or a paddle attachment. The dough will look like it is breaking at first, but keep mixing. By the fourth egg, the dough should be glossy, thick, and fall slowly from the spoon in a “V” shape. This consistency is the secret to perfect Easy Cream Puffs.
- Shape the Pastry: Use a piping bag with a large round tip or two spoons to drop mounds of dough onto the prepared baking sheets. Aim for about 2 tablespoons of dough per puff, spaced 2 inches apart. Use a damp finger to smooth down any pointy peaks so they do not burn.
- Bake to Perfection: Place the pans in the oven and bake at 425°F for 15 minutes. Then, without opening the oven door, reduce the heat to 375°F (190°C) and bake for another 10 to 15 minutes. The Easy Cream Puffs should be golden brown and feel light and hollow.
- Release the Steam: Remove the pans from the oven. Immediately use a small paring knife or a toothpick to poke a tiny hole in the side of each puff. This allows the internal steam to escape, preventing the Easy Cream Puffs from becoming soggy. Let them cool completely on a wire rack.
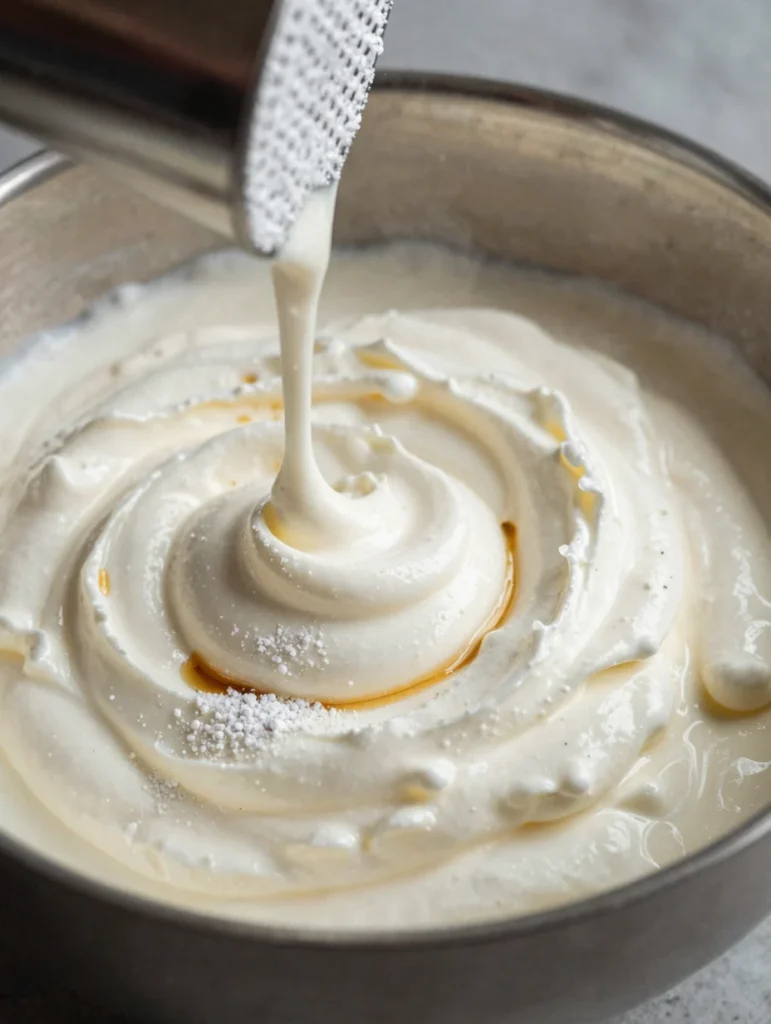
- Make the Filling: While the shells cool, beat the heavy cream, powdered sugar, and vanilla in a cold bowl until stiff peaks form.
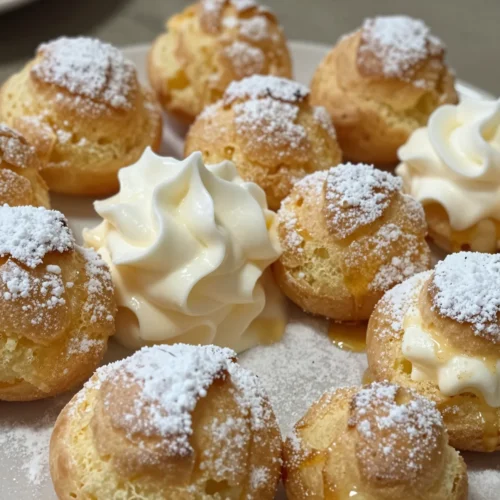
- Fill the Puffs: Once the Easy Cream Puffs are cold, you can either slice the tops off and spoon the cream inside or pipe the cream through the hole you made earlier. Dust with extra powdered sugar before serving.
Pro Tips for Success
The most common mistake when making Easy Cream Puffs is adding the eggs too quickly. Always ensure each egg is fully incorporated before adding the next one. This builds the protein structure needed for the puff to rise.
Another critical tip is to avoid opening the oven door during the first 20 minutes of baking. The sudden drop in temperature can cause the Easy Cream Puffs to collapse before they have set. I also recommend using room-temperature eggs, as they emulsify much better into the warm dough.
If your dough feels too runny, do not add more flour, instead, let it cool further or chill it for a few minutes. To get that perfectly crisp exterior, make sure the butter and water mixture reaches a full boil before adding the flour. Finally, always remember the “poke” method.
Releasing the steam is the difference between a crisp shell and a limp one. Following these small details will ensure your Easy Cream Puffs turn out perfectly every single time.
The most common mistake when making Easy Cream Puffs is adding the eggs too quickly. To further enhance your baking skills, check out this recipe for Easy Baked Mac and Cheese that will impress your family.
Storage & Reheating Tips
You can store unfilled Easy Cream Puffs in an airtight container at room temperature for up to two days. If you need to keep them longer, they freeze beautifully. Place the baked and cooled shells in a freezer-safe bag for up to two months.
When you are ready to use them, thaw the shells at room temperature. To regain their crispness, pop the empty shells into a 350°F oven for about 5 minutes, then let them cool before filling. Once you fill the Easy Cream Puffs with whipped cream, they are best enjoyed within a few hours.
The moisture from the cream will eventually soften the pastry. If you have leftover filled Easy Cream Puffs, keep them in the refrigerator, but know they will lose their crunch. I usually recommend filling only what you plan to eat immediately to keep the Easy Cream Puffs at peak quality.
What to Serve With This Recipe
These Easy Cream Puffs are a versatile dessert that pairs well with many flavors. I love serving them alongside a platter of fresh berries like strawberries, raspberries, and blueberries. The tartness of the fruit cuts through the richness of the cream beautifully.
If you are hosting a brunch, these Easy Cream Puffs go wonderfully with a hot cup of dark roast coffee or a delicate Earl Grey tea. For a more decadent presentation, serve the Easy Cream Puffs with a side of warm salted caramel sauce or a rich chocolate ganache for dipping. Mona often likes to serve them as part of a larger dessert board with small cookies and nuts.
If you want to lean into the “second chance” philosophy, try serving these Easy Cream Puffs after a light, balanced meal like a grilled salmon salad or a roasted vegetable pasta. They provide the perfect sweet ending without making the meal feel too heavy.
These Easy Cream Puffs are a versatile dessert that pairs well with many flavors. For a delightful brunch experience, serve them alongside a warm bowl of Easy Chicken Tortilla Soup.
FAQs
Why did my Easy Cream Puffs fall or deflate?
Easy Cream Puffs usually deflate because they were removed from the oven too early or the oven door was opened during the baking process. The structure needs time to firm up. Additionally, if you forget to poke a hole in the side to release steam after baking, the trapped moisture will soften the shell from the inside out.
Can I make the dough for Easy Cream Puffs in advance?
Yes, you can prepare the choux pastry dough up to 24 hours in advance. Keep it in an airtight container or a piping bag in the refrigerator. When you are ready to bake, let the dough sit at room temperature for about 30 minutes so it is easier to pipe, then follow the standard baking instructions for Easy Cream Puffs.
Why do my cream puffs taste like eggs?
If your Easy Cream Puffs have a strong eggy taste, it might be because the dough did not cook long enough on the stove or the eggs were particularly large. Make sure you cook the flour paste until a film forms on the pan. Using high-quality vanilla extract in your filling also helps balance the natural flavor of the pastry shells.
Can I use a hand mixer to add the eggs?
Absolutely. While a wooden spoon is traditional, a hand mixer or a stand mixer makes the process of adding eggs to your Easy Cream Puffs much faster and easier. Use a medium speed and stop as soon as the dough becomes glossy and smooth to avoid over-incorporating air.
How do I know when the cream puffs are fully baked?
Your Easy Cream Puffs are done when they are a deep golden brown and feel very light when you pick them up. If they look pale, they likely still have too much moisture inside and will collapse. They should sound hollow when you gently tap the bottom of the shell.
Easy Cream Puffs are a classic French pastry made from choux dough, which is light and airy. They can be filled with a variety of creams and are often enjoyed as a sweet treat or dessert, making them a favorite among pastry lovers. Learn more about this delightful dessert in this detailed article.
Nutrition Information (per serving)
This information is an estimate based on one filled puff. Actual values may vary depending on the specific brands of ingredients you choose.
| Nutrient | Amount per Serving |
|---|---|
| Calories | 145 kcal |
| Total Fat | 11g |
| Saturated Fat | 7g |
| Cholesterol | 75mg |
| Sodium | 65mg |
| Total Carbohydrates | 9g |
| Sugars | 4g |
| Protein | 3g |
I hope you enjoy making these Easy Cream Puffs as much as Mona and I enjoy eating them. They are a true testament to the fact that with a little patience and the right method, anyone can master the art of pastry. Happy baking from SecondRecipes.com!
Easy Cream Puffs
Ingredients
- 1 cup Water
- 1/2 cup Unsalted Butter (cubed)
- 1 cup All-Purpose Flour
- 1/4 teaspoon Salt
- 1 teaspoon Granulated Sugar
- 4 Large Eggs (at room temperature)
- 2 cups Heavy Whipping Cream (cold)
- 1/2 cup Powdered Sugar
- 1 teaspoon Pure Vanilla Extract
Instructions
- Preheat your oven to 425°F (220°C) and line two baking sheets with parchment paper.
- In a medium saucepan, combine water, cubed butter, sugar, and salt. Bring to a boil.
- Remove from heat and add flour all at once, stirring vigorously until fully incorporated.
- Return to medium heat and cook for 1-2 minutes until a film forms on the bottom.
- Transfer dough to a bowl and let cool for 5 minutes.
- Incorporate eggs one at a time, mixing well after each addition until glossy.
- Pipe or spoon mounds of dough onto prepared baking sheets, spaced 2 inches apart.
- Bake at 425°F for 15 minutes, then reduce heat to 375°F and bake for another 10-15 minutes.
- Poke a hole in each puff to release steam and let cool on a wire rack.
- Beat heavy cream, powdered sugar, and vanilla until stiff peaks form.
- Fill cooled puffs with whipped cream and dust with powdered sugar before serving.